Remark.js for your Geeky Presentations


Remark.js is a flexible, browser-based presentation platform similar to the popular reveal.js except that it's more lightweight and easier to customize. Remark is targeted at people who know their way around HTML and CSS. And since it's based on the web, anything doable in the browser can play together with remark, mostly at minimum efforts. So if you're a Jedi of the web skills, only the sky is the limit.
What is it good for?
Consider that if you are in the following situations:
- You intent to present details with a bunch of code snippets to be shown
- You want to do interactive live (web) demo in your presentation
- You want to easily collaborate with others, share with and show your slides to everyone
- You want to have PDFs, so your slides can still be shared at Speaker Deck or SlideShare
- You want to focus on the content and to keep track of changes using your version control tool
Remark is an awesome platform addressing all of these. That’s not to say you can’t do that with mainstream software such as PowerPoint, Keynote, Google Slides or other WYSWIG tools. It might just be painful to always manually adjust or repeatedly style a bunch of things you want to show. In the web, this was long ago effectively solved by templating schemes. There are also many other things which remark offers. You might want to go through to the official introduction slides or directly to the project site.
With remark, writing your presentation is just a matter of composing a (simple) markdown document. It is next to plain text so you can focus on writing your content. Appearance might be polished later by selecting a pre-made template/style provided by others or by composing it by yourself. Investing in your own style is worth a try, since you can reuse it again and again. This is complied with DRY (Don’t Repeat Yourself) principle. Once you have finished, you might store it wherever you like eg. locally on your computer, on your Dropbox or Google Drive cloud, etc. You can easily share with the world by hosting it on any web server such as Github Pages alongside the stuff you’re presenting.
Let’s get started
As per official guide, it takes only a few steps to get up and running with remark:
- Create an HTML file to contain your slideshow (look at
boilerplate-*.htmlfiles at the remark’s github repo) - Open the HTML file in a decent browser
- Edit the Markdown and/or CSS styles as needed
- Press C to clone a display; press P to switch to presenter mode
Note that while remark presentation can be viewed offline, all boilerplate-*.html files need an Internet connection since they are using web font assets from Google CDN. To fully operate offline, all assets must be provided locally. Below is the sample code from boilerplate-remote.html (remote means remark.js is hosted somewhere in the Internet).
<!DOCTYPE html>
<html>
  <head>
    <title>Title</title>
    <meta charset="utf-8">
    <style>
      @import url(https://fonts.googleapis.com/css?family=Yanone+Kaffeesatz);
      @import url(https://fonts.googleapis.com/css?family=Droid+Serif:400,700,400italic);
      @import url(https://fonts.googleapis.com/css?family=Ubuntu+Mono:400,700,400italic);

      body { font-family: 'Droid Serif'; }
      h1, h2, h3 {
        font-family: 'Yanone Kaffeesatz';
        font-weight: normal;
      }
      .remark-code, .remark-inline-code { font-family: 'Ubuntu Mono'; }
    </style>
  </head>
  <body>
    <textarea id="source">

class: center, middle

# Title

---

# Agenda

1. Introduction
2. Deep-dive
3. ...

---

# Introduction

    </textarea>
    <script src="https://remarkjs.com/downloads/remark-latest.min.js">
    </script>
    <script>
      var slideshow = remark.create();
    </script>
  </body>
</html>
In this boilerplate, your markdown content lives within <textarea> block, while your custom style is inside the <style> section. The last <script> tag which contains var slideshow = remark.create(); is the javascript block that you might want to modify as you progress and get more accustomed with the framework. However, it is nothing but a regular HTML file, which you can restructure to your liking as long as it is valid. It is also possible to move slide content to separate markdown file. However, such a structure will need a web server for viewing the slides. Please refer to Remark Wiki for the details.
Under the hood, remark.js which is loaded in the browser will transform a markdown-formatted chunk of text into individual slides. Regular markdown rules apply with an exception that a line containing three dashes constitutes a new slide. One more thing, as you might notice from the markdown sample: to help out with slide layout and formatting, remark defines a few markdown extensions i.e.:
- Slide properties, for naming, styling and templating slides
- Content classes, for styling specific content
- Syntax highlighting, supporting a range of languages (via
hightlight.js)
Don’t worry about the syntax for now. It’s relatively straightforward if you look at some examples. I’ve set up a fiddle where you can start experimenting. Try to add more slides with some markdown text in it. Have a look at this guide if you’re not familiar with markdown formatting. Once you’re confident, move to this second fiddle which is ripped from this presentation by Ole Petter Bang, the author of remark.
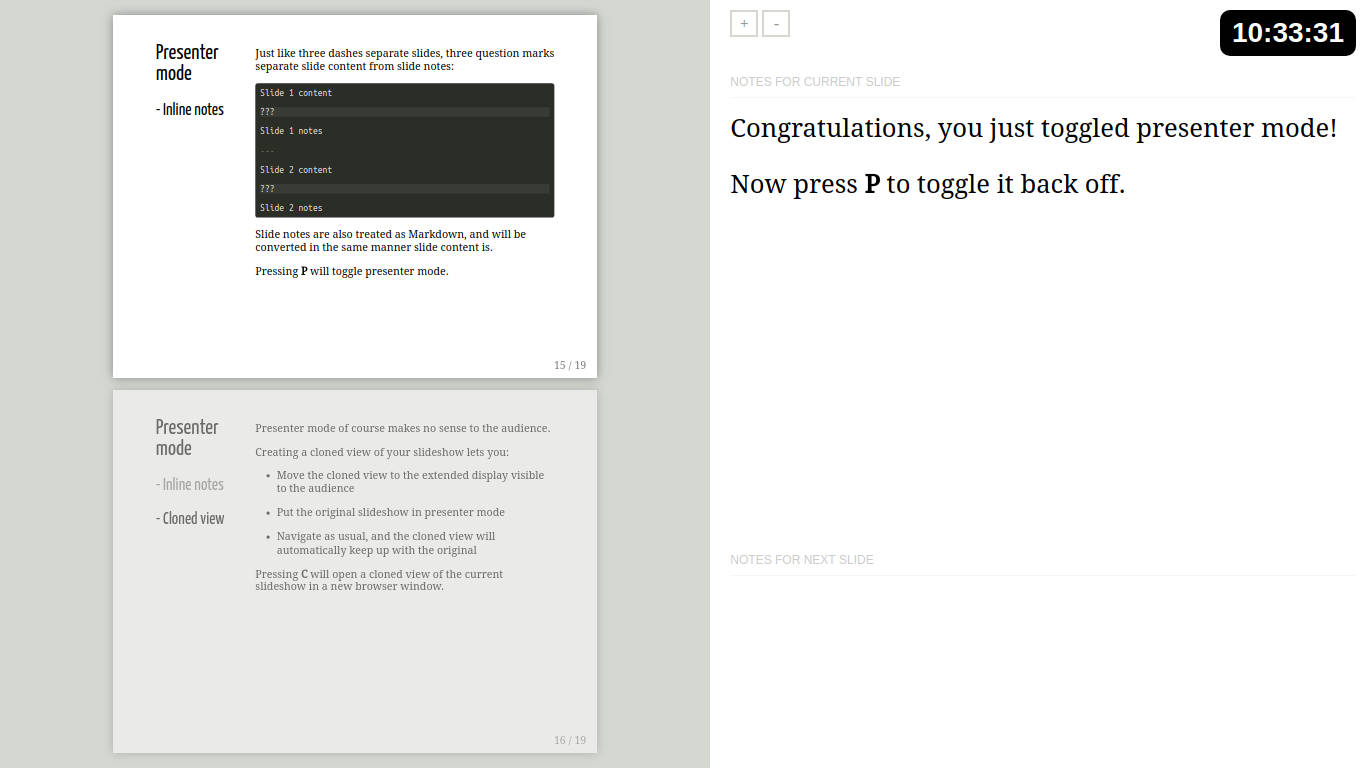
Presenter mode
The presenter mode can be activated by pressing P key. It provides
- Display of slide notes for the current slide, to help you remember key points
- Display of upcoming slide, to let you know what’s coming
- Cloning of slideshow for viewing on extended display for audience (this will be in sync with the presenter view as you move forward or back)
Going further
Once you’ve finished with the basics, you might want to start your remark journey, perhaps into integration with external libraries, or into your own customized, advanced styling or into other things. In any case, your starting point shall be the official remark Wiki. If you’re looking for some inspirations you might check some real-world remark slideshows listed in remark’s project page. When that isn’t enough, you might look at some slides I’ve made for my classes, two of which are provided above. You might also want to browse my author page at Speaker Deck or at SlideShare for sample of the PDF exports from my personal remark slides.


